Step 6: Exporting Data for GC Wildlife Viewer
GC Wildlife Viewer is a map-and-filter app for exploring annotated camera trap images. Once tagging in Timelapse is far enough along, export a selection of annotations and the matching image files so people can browse them on a Guardian Connector instance without opening Timelapse.
Deploying the app itself is usually done by a Guardian Connector administrator; see Custom Applications: GC Wildlife Viewer if you need that part.
Exporting annotations is not the same as exporting images.
- File → Export or import data to/from a csv file writes a spreadsheet of tags and metadata. It does not copy any photos or videos.
- File → Copy Image/video files to another folder copies the actual media files.
Wildlife Viewer needs both: a CSV named ImageData.csv and a folder of the files in that same selection. A CSV by itself is useful for analysis or re-import into Timelapse, but the viewer will have nothing to show on the map.
What you need
The app expects two things, plus an optional third:
ImageData.csv— tabular data exported from Timelapse for the current selectionTimelapseExport/— a folder of the image (or video) files in that same selectiondeployment.csv— camera locations and deployment/retrieval dates (optional, but strongly recommended)
If you skip deployment.csv, the map will place cameras at placeholder coordinates. Those placeholders are currently hardcoded in the app, so they will not match your real study area.
A full Timelapse export (File → Export or import data to/from a csv file → Export all data (folder data, image/video data) to csv files...) is not supported by Wildlife Viewer yet. Use a selection.
You can still export all data as CSV for other analysis, or re-import a CSV back into a Timelapse project. That is a separate use of the same menu; it does not replace the image-copy step below.
1. Make a selection in Timelapse
Wildlife Viewer is meant for a curated subset — for example favorites, images with a species filled in, or a date range — not every file in the project.
- Open your project in Timelapse.
- Use Select → Custom selection... (or another Select menu option) to filter to the images you want in the viewer.
- Confirm the status bar or thumbnail strip shows only that subset.
Typical filters include:
- Images marked as Favorite
- Images with a non-blank species or local-name field
- A date/time range or a specific station folder
2. Export the selection as CSV
All data generated during review is stored locally on your machine.
- Go to File → Export or import data to/from a csv file → Export image/video data in the current selection to a csv...
- Save the file as
ImageData.csv. The app looks for that exact filename.
 The Timelapse "Export or import data to/from a csv file" menu.
The app depends on ImageData.csv. If that file is renamed, edited in a way that breaks its columns, or deleted, Wildlife Viewer will fail to start.
3. Copy the selected image files
The CSV does not include the photos. With the same selection still active:
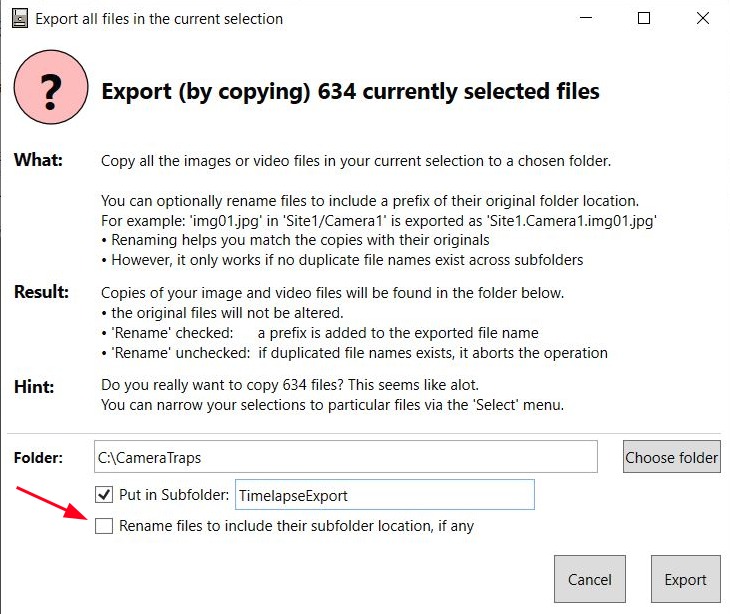
- Go to File → Copy Image/video files to another folder → Copy all Image or Video files in the current selection to...
- Choose an empty destination folder. A good name is
TimelapseExport.
You should now have:
WildlifeViewerExport/
├── ImageData.csv
└── TimelapseExport/
    ├── IMG_0001.JPG
    ├── IMG_0002.JPG
    └── ...
Do not mix in images that are not in the selection. The CSV rows and the files in TimelapseExport/ must describe the same set.
As shown in the screenshot above, ensure "Rename files to include their subfolder location, if any" is unchecked. It is checked by default, and will rename the files to include the subfolder location, which is not what we want.
4. Add deployment data (recommended)
deployment.csv tells the viewer where each camera was and when it was out. Rows are joined to the Timelapse export on location, region, and camera, and the image date/time must fall between the deployment and retrieval datetimes.
This is not the same file as Timelapse's folder-level Deployment.csv from Step 3. Create a separate CSV with these columns:
| Column | What to put in it |
|---|---|
location_name | Location name, lowercase. Join key with the Timelapse metadata. |
region | Region. Join key with the Timelapse metadata. |
camera_name | Camera name. Joined to the Timelapse camera field. |
deployment_date | Deployment date as month/day/year (for example 3/19/2024). |
deployment_time | Deployment time as HH:MM:SS. Combined with the date into a UTC datetime. |
retrieval_date | Retrieval date as month/day/year. |
retrieval_time | Retrieval time as HH:MM:SS. |
latitude | Decimal degrees. Used to plot the camera on the map. |
longitude | Decimal degrees. Used to plot the camera on the map. |
The filename must be deployment.csv.
If you already collect station coordinates and check dates in the field, reuse that information. See Camera Traps: Deployment and Collecting Data for why this metadata matters, and Step 3 if you stored similar fields in Timelapse folder metadata — you will still need to reshape them into this table.
5. Upload to Guardian Connector
On a Guardian Connector instance, Wildlife Viewer reads from a camera_traps folder on the datalake.
- Open File Browser.
- Go to the datalake and create a folder named
camera_trapsif it does not exist. - Upload
ImageData.csv, theTimelapseExport/folder, anddeployment.csv(if you have it) intocamera_traps.
The folder should look like this:
camera_traps/
├── ImageData.csv
├── TimelapseExport/
└── deployment.csv      ← optional, but recommended
Users can rename or delete files in File Browser. Wildlife Viewer copies ImageData.csv into an admin-only location the first time it runs, then reads from that copy, so a later accidental delete in File Browser is less likely to crash the app. Still: treat ImageData.csv as the source of truth, and do not overwrite it with a different selection unless you intend to replace what the viewer shows.
The paths camera_traps and deployment.csv are currently fixed in the app. You cannot point it at a different folder name yet.
After the export
Once the files are in camera_traps and Wildlife Viewer is deployed on the instance, you can browse the selection on a map and filter by the fields in your Timelapse CSV. You may need to ask a Guardian Connector administrator to restart the app.
If the app is not on your instance yet, ask a Guardian Connector administrator. Deployment notes live in the GC Wildlife Viewer README.