Step 3: Sensor Deployment
AudioMoth sensors can be deployed like most other acoustic sensors, however, it is really important to remember to a) check that the audiomoth is correctly oriented in the case, and b) that the time is correctly set prior to deployment.
Placement Guidance
- Mount units 1–2 m above ground for general biodiversity monitoring; higher placements reduce ground reflection noise.
- Keep sensors away from vegetation that may strike the case when it is windy (this will cause loud noise on the recordings).
- Orient the microphone toward the primary sound source when relevant (e.g., target habitat) and away from persistent sound sources (rivers/streams, roads, dominant wind direction, waves/surf from a shoreline).
- For rainfall-prone sites, a small rain shield placed above the sensor can reduce noise without overly obstructing sound (and protect the device from water intrusion).
Prepare for Deployment
Record the following on the deployment datasheet:
- Device ID
- SD card ID
- Survey point ID (SPID)
- Longitude/Latitude
- Deployment date/time
Create an Intro Recording
-
Remove AudioMoth from housing.
-
Switch to Default to start immediate recording.
-
Ensure red LED flashes.
-
Record audio notes:
“This is [name] on [date] at [time]. Site: [SPID]. Sensor name: [sensor_name] Additional notes…”
Ex. "This is Abram Fleishman on 8 Dec 2025 at 12:10 PM. I am at Site 17 32.95332 N, -111.45922 W. I am deploying Sensor A01 at the edge of a forest with tall trees to the west and a field to the east. There is a goose nest 3 m to the SE of the sensor. "
-
Switch to USB/Off for 5 seconds.
- Red LED will flash 1–4 times indicating battery level.
-
Switch to Custom to start scheduled operation. Ensure that LED flashes red if sensor is currently scheduled to record, or blinks green if between recordings.
When the sensor is first switched to Custom, if the LEDs show solid red + flashing green it means the date/time is not set! See Resetting the Time in the Field for info on how to correct the time without needing to plug it back in to a computer.
Deploy the Sensor
-
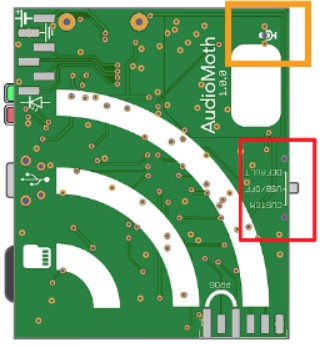
Return the sensor to its housing. Make sure the microphone hole (orange box below) on the AudioMoth circuit board is oriented correctly in the case and lines up with the microphone hole on the case.
-
Ensure SD card remains fully clicked in.
-
Close the housing and mount to a tree, stake or structure.
-
Avoid placing the sensor in a way that the microphone is physically blocked or placing the sensor near rustling foliage or other loud features on the landscape (e.g. site that is exposed to high wind or loud running water, site near continuously occupied chicken coop or cattle corral).
-
Confirm datasheet is fully filled out and complete.
During sleep between recordings, a single green LED flashes every 2 seconds. Refer to the LED guide if abnormal flashing occurs.
in humid or wet environments, it is recommended to purchase small desiccant packets that can be placed inside the cases (between the case and the sensor on the hinge side of the case).